Skip to main content Skip to footer
TripCart
  • Support
  • Login
Start Free Trial
TripCart
  • Tour Operators
  • Rental Companies
  • Boat Tours
  • Attractions
  • Trains
  • Ziplines
  • Farms
  • Customer Stories
Start Free TrialBook a Demo

Create and Manage Tours

  • How to Add Group Discount
  • How to Create a Multi-Day Tour
  • How to Create a Single-Day or Activity Tour?
  • How to Create Tour Packages for Multi-Day and Single-Day/Activities
  • How to add Destinations for Tour?
  • How to Add Activities for Tours
  • What are Add-ons, and How to Use Them?
  • How to Add Accommodations to Tours
  • How to setup Customer’s Account Page
  • How to Enable and Manage Coupon Codes for Tours
  • How to View and Manage Tour Bookings
  • How to Display Reviews for Your Tours
  • How to Set and Manage Difficulty Levels for Tours
  • How to Add and Manage Tour Information
  • How to Import Tours

Tour Settings

  • How to add Meal Options
  • How to edit Traveler Login Page details
  • How to Enable the Deposit Payment Feature
  • How to enable Discount on Full Payment
  • How to Add Tour Highlight
  • How to Block Dates For Tours
  • How to Add WhatsApp Number To Your Tour Detail Page
  • How to set Tour Inquiry Lead Form
  • How to Define Pricing Categories for Tours
  • How to Configure the Currency Settings
  • How to Add Custom Filters

Website Settings

  • How to Customize Colors and Fonts on Your Website?
  • How to Enable the Scroll-to-Top Button
  • How to Add Sections to the Homepage
  • How to Clear Website Cache
  • How to Translate Your Website into a Local Language
  • How to Create and Manage Menus
  • How to Customize the Website Footer?
  • How to Add Meta Titles and Descriptions for the Homepage?
  • How to Configure the Website Header?
  • How to connect your domain

Payment Gateways

  • How to Manage Tax Settings in Tripcart
  • How to configure Getnet Payment Gateway
  • How to configure the Midtrans Payment Gateway
  • How to configure the Revolut Payment Gateway?
  • How to configure the Global IME Payment Gateway
  • How to configure the Xendit Payment Gateway
  • How to configure the RazorPay Payment Gateway
  • How to Add a Custom Booking Link for Your Tours
  • How to Set Up a Payment Reminder for Due Amounts
  • How to Create Custom Payment Links for Bookings or Invoice
  • How to Enable and Use the Booking Fee Feature
  • How to Configure HBL Payment Gateway
  • How to Configure Authorize.net Payment Gateway
  • How to Configure Payment Settings for Checkout
  • How to Configure Stripe Payment Gateway
  • How to Configure PayPal Payment Gateway
  • How to Configure Cybersource Payment Gateway
  • How to Configure Nabil Bank Payment Gateway
  • Book Now and Pay later

Email Notifications

  • How to Set Up Email Notifications for Customers
  • How to Configure SMTP for Your Website
  • How to Customize the Header and Footer for Emails

Pages and Posts

  • How to Create Pages?
  • How to Publish Blog Posts on Your Site?
  • How to Add Categories and Assign Them to Posts?
  • How to add FAQs Block using Text Editor?

Apps

  • Tools
  • Reviews
  • Form Builder

Account Settings

  • How to Add or Remove Team Members
  • How to Update Your Company Information
  • How to Update Your Profile Information

FAQs

  • How to Check File Storage Usage and Email Quotas?
  • What is a Workspace, and How to Create One?
  • How to Update the Website Footer Copyright

SEO Settings

  • How to Add SEO Meta Titles and Descriptions to Default Pages
  • How to Analyze the SEO Score for Tours, Posts, and Pages
  • How to Enable or Disable Breadcrumbs on Your Website
  • How to Update the URL Structure for Default Pages

Tools

  • How to Integrate Google Translate
  • How to create API Keys
  • How to add Travel Insurance
  • How to create Webhooks
  • How to configure the Checkout Form Editor?
  • How to use the Reusable Blocks?
  • How to configure the White Label
  • How to Create and Embed Forms on Your Website
  • How to Bulk Import Redirections Easily
  • How to add a Notice Bar
  • How to add the Altitude Chart in Tour Itinerary
  • How to add Itinerary Info
  • How to Configure a Cookie Consent Notice for Your Website
  • How to Integrate reCAPTCHA for Bot Protection
  • How to Add Custom CSS to Your Website
  • How to Add Scripts (e.g., Google Analytics) to Your Website
  • How to Set Up Redirection for Your Site

Import

  • How to import WP Travel Engine trips
  • How to import WordPress Posts and Pages

Payments and Billing

  • How to upgrade or downgrade your plan
  • How to download your invoice
  • How to cancel your plan
View Categories
  • Home
  • Documentation
  • Payment Gateways
  • How to Configure Stripe Payment Gateway

How to Configure Stripe Payment Gateway

2 min read

Tripcart has integrated with Stripe’s payment gateway, allowing users to book trips using Stripe. To configure Stripe on Tripcart, you will need to add a Publishable key and a Secret Key. Follow the steps below to complete the integration.

Navigate to Payment Gateways: #

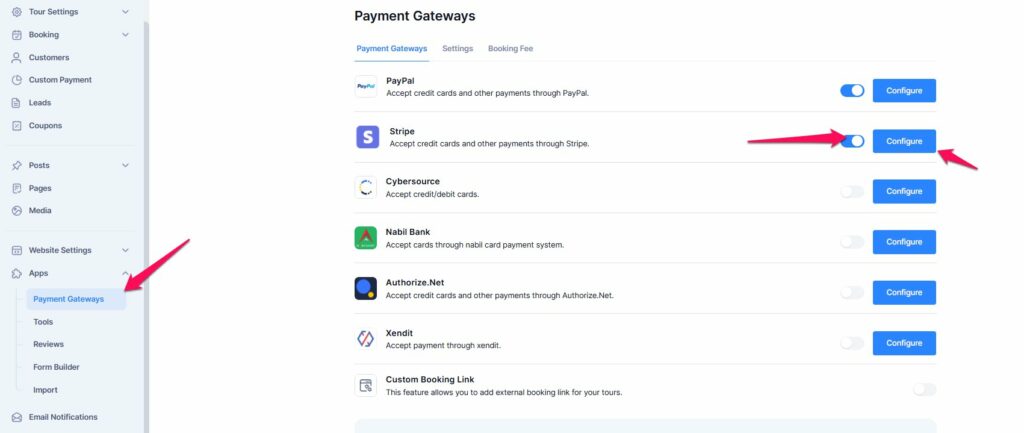
  • Go to the Dashboard > Apps.
  • Select Payment Gateways.

Enable Stripe Payment Gateway: #

  • Find the Stripe payment gateway in the list.
  • Toggle the switch to enable the Stripe payment gateway. This will make the Stripe option appear on the checkout page.

Configure Stripe: #

  • Click on the Configure button next to the Stripe payment gateway.
  • You will be prompted to add the Publishable key and Secret key.

How to obtain Publishable key and Secret key: #

Stripe provides two types of API keys for integrating payments: Publishable Key and Secret Key. These keys allow developers to process payments, manage transactions, and interact with Stripe’s services. Follow the steps below to obtain these keys.

  • Visit Stripe’s official website.
  • Click Sign In at the top right corner.
  • Enter your email and password, then click Continue.
  • Complete any two-factor authentication (if enabled) to access your account.
  • Once logged in, navigate to the Developers section from the left menu.
  • Click on API Keys under the Developers menu.
  • Once you have obtained the Publishable key and Secret key from Stripe, enter them in the respective fields on the Tripcart configuration page.
  • Click Save Credentials to save the information.

How to obtain Webhooks Signing Secret: #

A webhook is a way for one application (or system) to send real-time data to another application automatically when something specific happens.

Stripe sends a webhook notification to a specified URL whenever an event like a successful payment occurs. To ensure these notifications are genuine, Stripe provides a signing secret when you set up your webhook URL in the Stripe dashboard. This secret allows your website to verify that incoming requests truly came from Stripe, protecting against fake or unauthorized webhook attempts.

Follow the steps below to obtain the Webhooks Signing Secret:

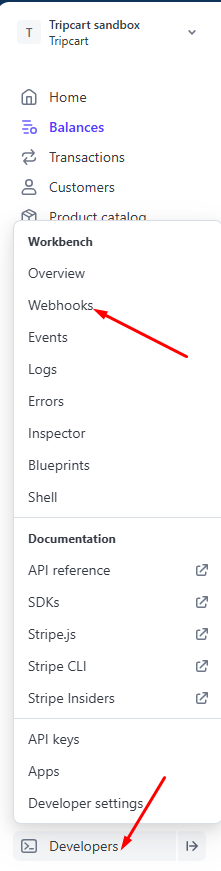
  • Go to Stripe Dashboard and log in to your account.
  • From the left-hand menu, click on Developers.
  • Under Developers, select Webhooks.
  • Click the “Add endpoint” (or “Add destination”) button.
  • Choose the account this destination should listen to.
  • Select your preferred API version.
  • Tripcart currently supports the following webhook events. Add each one individually:
    • payment_intent.succeeded
    • payment_intent.processing
    • payment_intent.payment_failed
    • payment_intent.canceled
    • checkout.session.completed
  • After adding all the events, click Continue.
  • Enter a Destination Name of your choice.
  • For the Endpoint URL, go to your Tripcart dashboard and copy the Webhook Endpoint URL from Stripe settings.
  • Now Endpoint URL and create a destination.
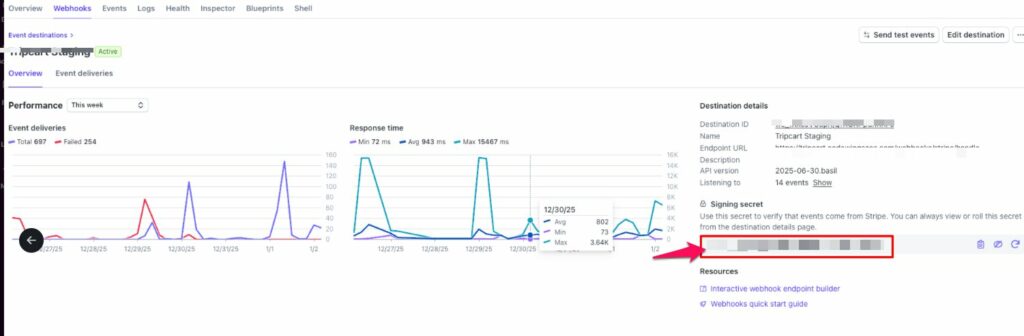
  • Once created, Stripe will display a Signing Secret for the webhook.
  • Copy the Signing Secret key provided by Stripe.
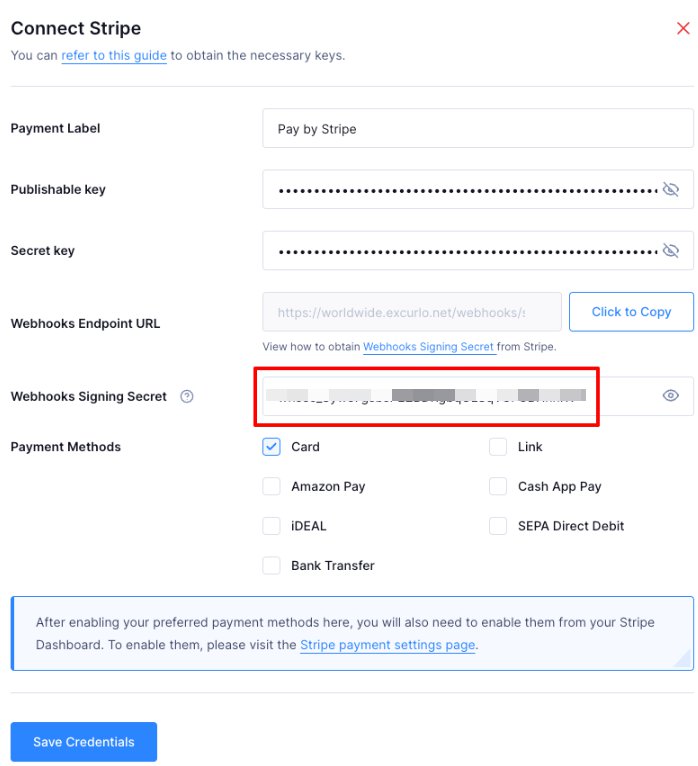
  • Go back to your Tripcart dashboard and paste the secret key into the Webhook Signing Secret Key field.

Stripe Payment Methods Support #

Stripe now offers a range of new and region-specific payment methods, designed to provide a more flexible and localized checkout experience for both businesses and their customers. We have also integrated some of these payment methods in Tripcart. Provides the full suite of Stripe-supported payment methods:

  • Bank Transfer
  • Cards
  • Link
  • iDEAL
  • SEPA Direct Debit
  • Cash App Pay
  • Amazon Pay

To display these payment options at checkout, you must first enable them from your Stripe dashboard. Additionally, ensure that your Stripe account is configured with the appropriate presentment currency, as the availability of certain payment methods depends on it.

Please note:

  • Card and Link are available for all the currencies supported by the stripe.
  • iDEAL and SEPA Direct Debit are only available for EUR presentment currencies.
  • Cash App Pay, Amazon Pay, and Bank Transfer are only available for USD presentment currencies.
  • After enabling these payment gateways, you’ll also need to activate them in the Stripe settings under Tripcart to ensure they appear on the checkout page.

By following these steps, you will have successfully configured the Stripe payment gateway for Tripcart, allowing users to book their trips using Stripe.

📧 If you face any issues or have questions, please reach out to our support team or initiate the chat located on the right.

Updated on January 2, 2026
How to Configure Payment Settings for CheckoutHow to Configure PayPal Payment Gateway
Table of Contents
  • Navigate to Payment Gateways:
  • Enable Stripe Payment Gateway:
    • Configure Stripe:
  • How to obtain Publishable key and Secret key:
  • How to obtain Webhooks Signing Secret:
  • Stripe Payment Methods Support
© 2025 Tripcart. All rights reserved.