
Skip to main content Skip to footer
TripCart
  • Support
  • Login
Start Free Trial
TripCart
  • Tour Operators
  • Rental Companies
  • Boat Tours
  • Attractions
  • Trains
  • Ziplines
  • Farms
  • Customer Stories
Start Free TrialBook a Demo

Create and Manage Tours

  • How to Add Group Discount
  • How to Create a Multi-Day Tour
  • How to Create a Single-Day or Activity Tour?
  • How to Create Tour Packages for Multi-Day and Single-Day/Activities
  • How to add Destinations for Tour
  • How to Add Activities for Tours
  • What are Add-ons, and How to Use Them?
  • How to Add Accommodations to Tours
  • How to setup Customer’s Account Page
  • How to Enable and Manage Coupon Codes for Tours
  • How to View and Manage Tour Bookings
  • How to Display Reviews for Your Tours
  • How to Set and Manage Difficulty Levels for Tours
  • How to Add and Manage Tour Information
  • How to Import Tours

Tour Settings

  • How to configure Display Preference
  • How to add Meal Options
  • How to edit Traveler Login Page details
  • How to Enable the Deposit Payment Feature
  • How to enable Discount on Full Payment
  • How to Add Tour Highlight
  • How to Block Dates For Tours
  • How to Add WhatsApp Number To Your Tour Detail Page
  • How to set Tour Inquiry Lead Form
  • How to Define Pricing Categories for Tours
  • How to Configure the Currency Settings
  • How to Add Custom Filters

Website Settings

  • How to Customize Colors and Fonts on Your Website?
  • How to Enable the Scroll-to-Top Button
  • How to Add Sections to the Homepage
  • How to Clear Website Cache
  • How to Translate Your Website into a Local Language
  • How to Create and Manage Menus
  • How to Customize the Website Footer
  • How to Add Meta Titles and Descriptions for the Homepage?
  • How to Configure the Website Header
  • How to connect your domain

Payment Gateways

  • How to Manage Tax Settings in Tripcart
  • How to configure Getnet Payment Gateway
  • How to configure the Midtrans Payment Gateway
  • How to configure the Revolut Payment Gateway?
  • How to configure the Global IME Payment Gateway
  • How to configure the Xendit Payment Gateway
  • How to configure the RazorPay Payment Gateway
  • How to Add a Custom Booking Link for Your Tours
  • How to Set Up a Payment Reminder for Due Amounts
  • How to Create Custom Payment Links for Bookings or Invoice
  • How to Enable and Use the Booking Fee Feature
  • How to Configure HBL Payment Gateway
  • How to Configure Authorize.net Payment Gateway
  • How to Configure Payment Settings for Checkout
  • How to Configure Stripe Payment Gateway
  • How to Configure PayPal Payment Gateway
  • How to Configure Cybersource Payment Gateway
  • How to Configure Nabil Bank Payment Gateway
  • Book Now and Pay later

Email Notifications

  • How to Set Up Email Notifications for Customers
  • How to Configure SMTP for Your Website
  • How to Customize the Header and Footer for Emails

Pages and Posts

  • How to Create Pages
  • How to Publish Blog Posts on Your Site
  • How to Add Categories and Assign Them to Posts
  • How to add FAQs Block using Text Editor

Apps

  • Tools
  • Reviews
  • Form Builder

Account Settings

  • How to Add or Remove Team Members
  • How to Update Your Company Information
  • How to Update Your Profile Information

FAQs

  • How to Check File Storage Usage and Email Quotas?
  • What is a Workspace, and How to Create One?
  • How to Update the Website Footer Copyright

SEO Settings

  • How to Add SEO Meta Titles and Descriptions to Default Pages
  • How to Analyze the SEO Score for Tours, Posts, and Pages
  • How to Enable or Disable Breadcrumbs on Your Website
  • How to Update the URL Structure for Default Pages

Tools

  • How to configure Google Analytics 4
  • How to Integrate Google Translate
  • How to create API Keys
  • How to add Travel Insurance
  • How to create Webhooks
  • How to configure the Checkout Form Editor?
  • How to use the Reusable Blocks
  • How to configure the White Label
  • How to Create and Embed Forms on Your Website
  • How to Bulk Import Redirections Easily
  • How to add a Notice Bar
  • How to add the Altitude Chart in Tour Itinerary
  • How to add Itinerary Info
  • How to Configure a Cookie Consent Notice for Your Website
  • How to Integrate reCAPTCHA for Bot Protection
  • How to Add Custom CSS to Your Website
  • How to Add Scripts (e.g., Google Analytics) to Your Website
  • How to Set Up Redirection for Your Site

Import

  • How to import WP Travel Engine trips
  • How to import WordPress Posts and Pages

Payments and Billing

  • How to upgrade or downgrade your plan
  • How to download your invoice
  • How to cancel your plan
View Categories
  • Home
  • Documentation
  • Apps
  • Form Builder

Form Builder

< 1 min read

You can create different forms for general inquiries, contact purposes, and more by following the steps below:

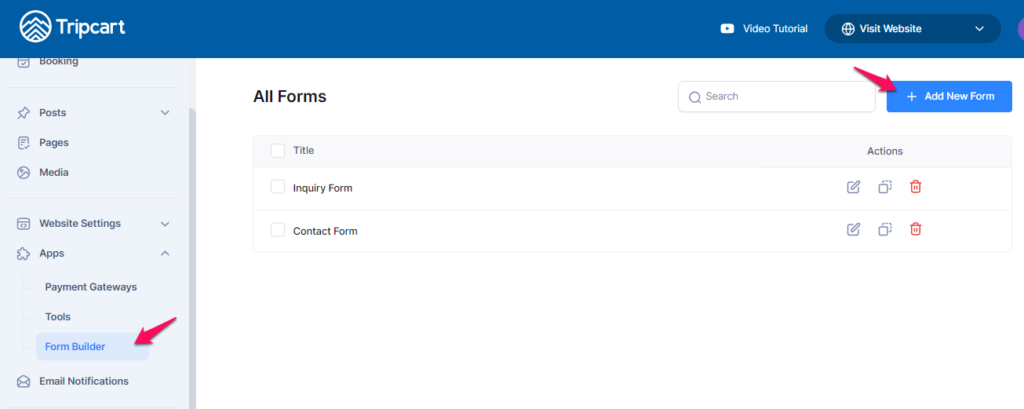
  1. Go to your Dashboard and select Apps > Form Builder.
  2. Click on Add New Form to start creating your form.
  • Please add the name of the form.
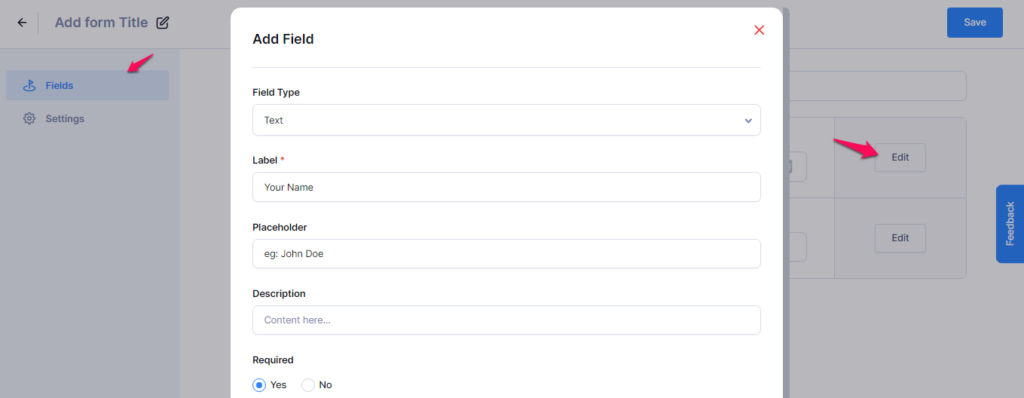
  • You can configure the fields you want to include in your form.
  • Click on Edit for each field to customize its type, label, placeholder text, and description. You can also choose whether to make the field required or optional.
  • Add as many fields as needed based on your requirements.
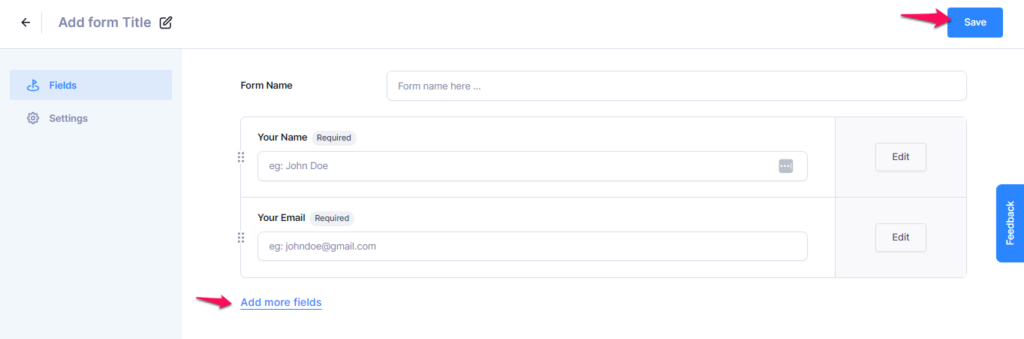
  • Please Save the changes once you create a form.

Settings #

You can also configure the settings for each form:

  • Email Notification: Update the admin email address where you’d like to receive form submissions and customize the subject line of the contact form.
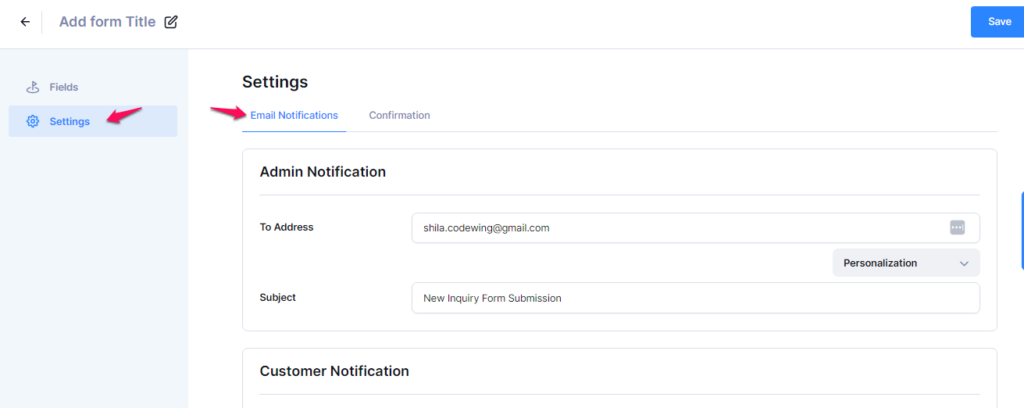
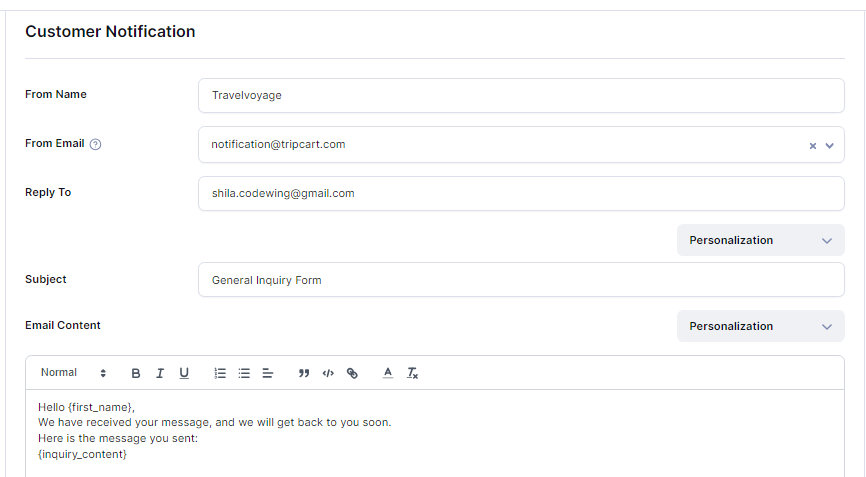
  • Customer Notification: You can customize the name, email content, subject, and specify the email address where you want to receive messages.
  • Confirmation: You can also customize the confirmation message here.

Updated on December 24, 2024
ReviewsTools
Table of Contents
  • Settings
© 2025 Tripcart. All rights reserved.