
Skip to main content Skip to footer
TripCart
  • Support
  • Login
Start Free Trial
TripCart
  • Tour Operators
  • Rental Companies
  • Boat Tours
  • Attractions
  • Trains
  • Ziplines
  • Farms
  • Customer Stories
Start Free TrialBook a Demo

Create and Manage Tours

  • How to Add Group Discount
  • How to Create a Multi-Day Tour
  • How to Create a Single-Day or Activity Tour?
  • How to Create Tour Packages for Multi-Day and Single-Day/Activities
  • How to add Destinations for Tour
  • How to Add Activities for Tours
  • What are Add-ons, and How to Use Them?
  • How to Add Accommodations to Tours
  • How to setup Customer’s Account Page
  • How to Enable and Manage Coupon Codes for Tours
  • How to View and Manage Tour Bookings
  • How to Display Reviews for Your Tours
  • How to Set and Manage Difficulty Levels for Tours
  • How to Add and Manage Tour Information
  • How to Import Tours

Tour Settings

  • How to configure Display Preference
  • How to add Meal Options
  • How to edit Traveler Login Page details
  • How to Enable the Deposit Payment Feature
  • How to enable Discount on Full Payment
  • How to Add Tour Highlight
  • How to Block Dates For Tours
  • How to Add WhatsApp Number To Your Tour Detail Page
  • How to set Tour Inquiry Lead Form
  • How to Define Pricing Categories for Tours
  • How to Configure the Currency Settings
  • How to Add Custom Filters

Website Settings

  • How to Customize Colors and Fonts on Your Website?
  • How to Enable the Scroll-to-Top Button
  • How to Add Sections to the Homepage
  • How to Clear Website Cache
  • How to Translate Your Website into a Local Language
  • How to Create and Manage Menus
  • How to Customize the Website Footer
  • How to Add Meta Titles and Descriptions for the Homepage?
  • How to Configure the Website Header
  • How to connect your domain

Payment Gateways

  • How to Manage Tax Settings in Tripcart
  • How to configure Getnet Payment Gateway
  • How to configure the Midtrans Payment Gateway
  • How to configure the Revolut Payment Gateway?
  • How to configure the Global IME Payment Gateway
  • How to configure the Xendit Payment Gateway
  • How to configure the RazorPay Payment Gateway
  • How to Add a Custom Booking Link for Your Tours
  • How to Set Up a Payment Reminder for Due Amounts
  • How to Create Custom Payment Links for Bookings or Invoice
  • How to Enable and Use the Booking Fee Feature
  • How to Configure HBL Payment Gateway
  • How to Configure Authorize.net Payment Gateway
  • How to Configure Payment Settings for Checkout
  • How to Configure Stripe Payment Gateway
  • How to Configure PayPal Payment Gateway
  • How to Configure Cybersource Payment Gateway
  • How to Configure Nabil Bank Payment Gateway
  • Book Now and Pay later

Email Notifications

  • How to Set Up Email Notifications for Customers
  • How to Configure SMTP for Your Website
  • How to Customize the Header and Footer for Emails

Pages and Posts

  • How to Create Pages
  • How to Publish Blog Posts on Your Site
  • How to Add Categories and Assign Them to Posts
  • How to add FAQs Block using Text Editor

Apps

  • Tools
  • Reviews
  • Form Builder

Account Settings

  • How to Add or Remove Team Members
  • How to Update Your Company Information
  • How to Update Your Profile Information

FAQs

  • How to Check File Storage Usage and Email Quotas?
  • What is a Workspace, and How to Create One?
  • How to Update the Website Footer Copyright

SEO Settings

  • How to Add SEO Meta Titles and Descriptions to Default Pages
  • How to Analyze the SEO Score for Tours, Posts, and Pages
  • How to Enable or Disable Breadcrumbs on Your Website
  • How to Update the URL Structure for Default Pages

Tools

  • How to configure Google Analytics 4
  • How to Integrate Google Translate
  • How to create API Keys
  • How to add Travel Insurance
  • How to create Webhooks
  • How to configure the Checkout Form Editor?
  • How to use the Reusable Blocks
  • How to configure the White Label
  • How to Create and Embed Forms on Your Website
  • How to Bulk Import Redirections Easily
  • How to add a Notice Bar
  • How to add the Altitude Chart in Tour Itinerary
  • How to add Itinerary Info
  • How to Configure a Cookie Consent Notice for Your Website
  • How to Integrate reCAPTCHA for Bot Protection
  • How to Add Custom CSS to Your Website
  • How to Add Scripts (e.g., Google Analytics) to Your Website
  • How to Set Up Redirection for Your Site

Import

  • How to import WP Travel Engine trips
  • How to import WordPress Posts and Pages

Payments and Billing

  • How to upgrade or downgrade your plan
  • How to download your invoice
  • How to cancel your plan
View Categories
  • Home
  • Documentation
  • Create and Manage Tours
  • How to Enable and Manage Coupon Codes for Tours

How to Enable and Manage Coupon Codes for Tours

2 min read

Tripcart provides a built-in coupon code management system that allows you to create discount codes for tours. You can use coupon codes to offer promotional discounts, encourage bookings, and reward loyal customers. This guide will walk you through enabling and configuring coupon codes for your tours. Please follow the below instructions to add a Coupon Code.

  1. Log in to the Tripcart Admin Panel
    • Navigate to your Tripcart dashboard.
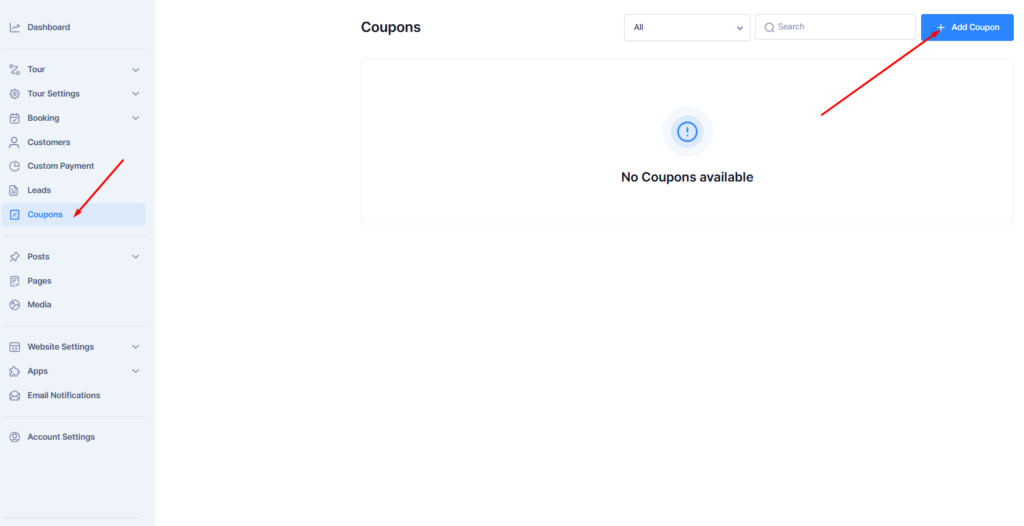
    • On the left-hand sidebar, locate and click on the Coupons option.
    • This will open the Coupons page where you can manage and create discount codes.
Creating a New Coupon Code #

  1. Click on “Add Coupon”
    • On the Coupons page, click on the blue Add Coupon button.
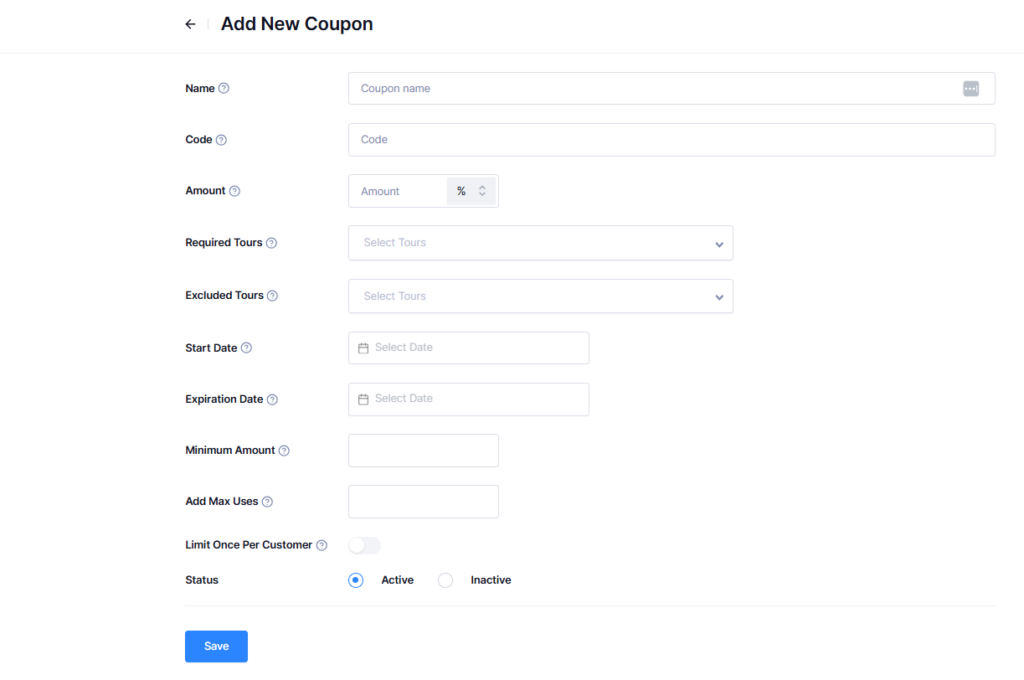
  2. Enter Coupon Details
    • Name: Provide a recognizable name for the coupon (e.g., “Summer Sale 2024”).
    • Code: Enter the coupon code that customers will use at checkout (e.g., “SUMMER24”).
    • Amount: Specify the discount amount. Choose between a fixed amount or a percentage.
    • Required Tours: Select specific tours that the coupon applies to.
    • Excluded Tours: Select tours that should not be eligible for the discount.
    • Start Date: Choose the date when the coupon becomes active.
    • Expiration Date: Set the date when the coupon expires.
    • Minimum Amount: Specify a minimum purchase amount required for the coupon to be applicable.
    • Add Max Uses: Limit the number of times the coupon can be used.
    • Limit Once Per Customer: Toggle this option if the coupon should be used only once per customer.
    • Status: Set the coupon status to Active or Inactive.
    • Click the Save button to create the coupon.
Managing and Editing Coupons #

  1. View Existing Coupons
    • Return to the Coupons section to see a list of all created coupons.
  2. Edit a Coupon
    • Click on a coupon to modify its details.
    • Update any necessary fields and click Save to apply changes.
  3. Delete a Coupon
    • Locate the coupon you want to remove.
    • Click the delete option to permanently remove it from the system.

Applying Coupons at Checkout #

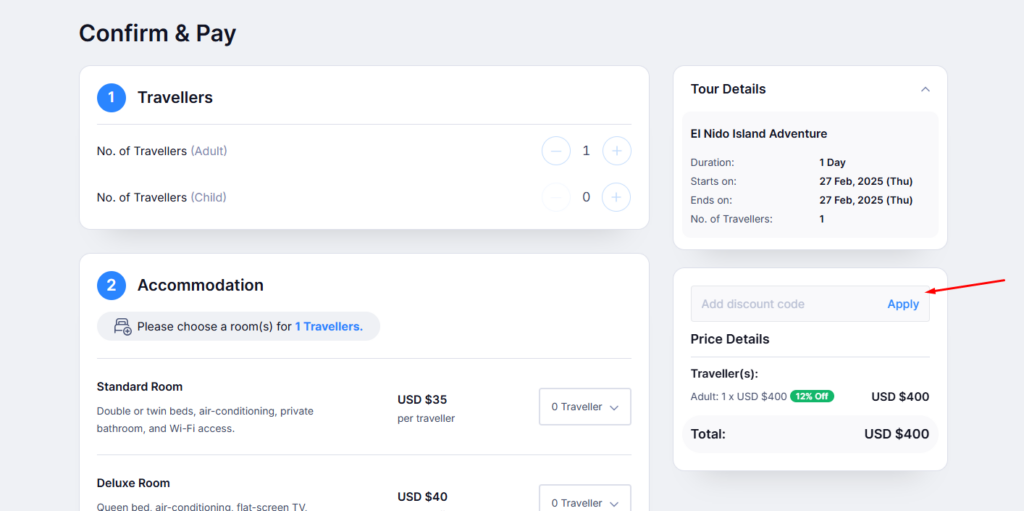
Once a coupon is active, customers can enter the coupon code at checkout to receive the discount. The system will validate the code based on the defined conditions (e.g., tour eligibility, expiration date, and usage limits). If the coupon is valid, the discount will be applied to the booking total.
Updated on March 18, 2025
How to setup Customer’s Account PageHow to View and Manage Tour Bookings
Table of Contents
  • Creating a New Coupon Code
  • Managing and Editing Coupons
  • Applying Coupons at Checkout
© 2025 Tripcart. All rights reserved.